Green shakshuka puts a healthy green spin on the classic shakshuka recipe. It’s an easy, one-pan dish filled with shaved brussels sprouts, spinach, zucchini, and poached eggs. Whether you eat it for breakfast or dinner, it’s a hearty, nutrient-packed meal that will last you through any season.

If you’ve read or seen snippets of my travels to Israel, you’ll know how much I’m inspired by Middle Eastern cuisine. Their dishes are loaded with veggies, herbs, and layers of fresh flavors – sounds like a Downshiftology recipe right? And one of my all-time favorite recipes is shakshuka.
The great thing about a shakshuka is it’s versatility. Similar to how you can toss most ingredients from your fridge into a smoothie, the same can be said for a shakshuka.
Whatever veggies you’ve got lying around from swiss chard, to Brussels sprouts, zucchini, green bell peppers, leeks or even artichoke hearts, just throw them in! So today, I’m turning my original shakshuka recipe into a loaded greens meal.

Green Shakshuka Ingredients
Traditionally, a shakshuka is a mixture of simmering tomato sauce and spices, topped with gently poached eggs. Within the tomato sauce there’s diced onions, garlic and bell peppers. Lastly, it’s garnished with freshly chopped herbs such as cilantro and parsley.
But for this green shakshuka, I’ll be replacing the tomato sauce and bell peppers with an abundance of sauteed green vegetables. Here’s what you’ll need.
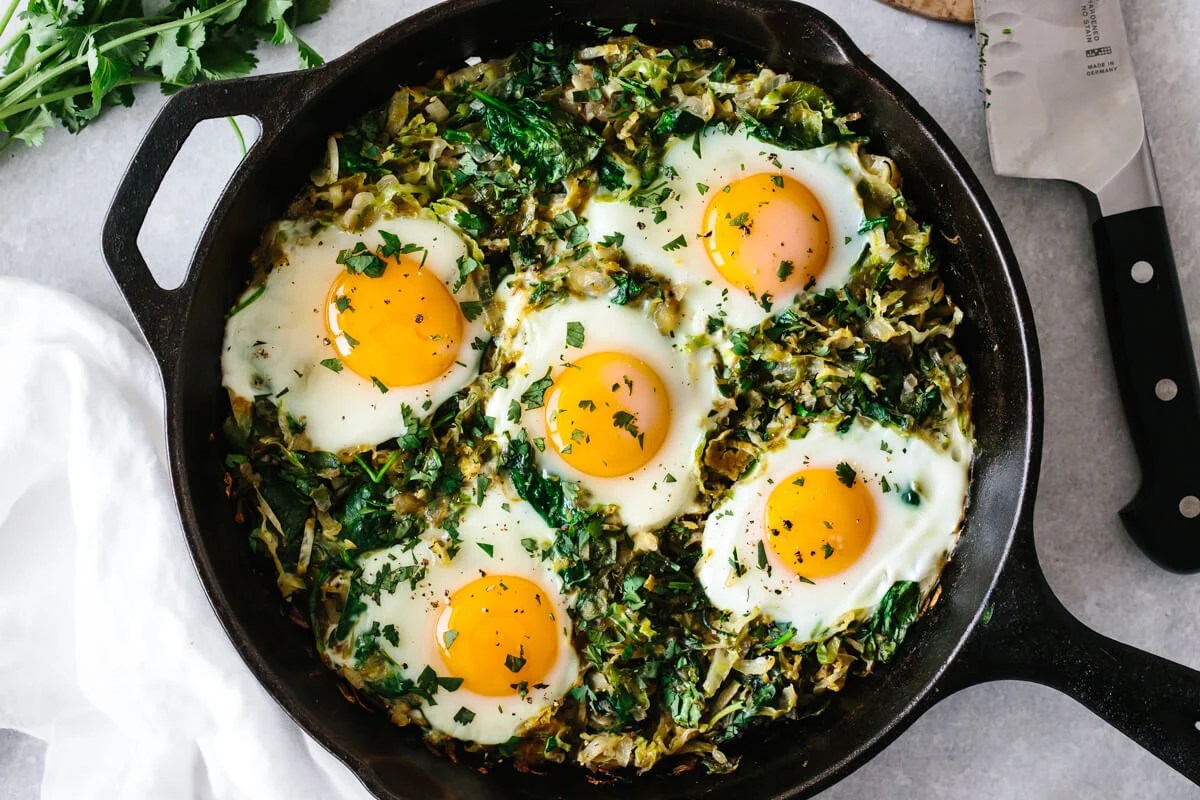
- Vegetables: brussels sprouts, zucchini, baby spinach, onion, and avocado
- Eggs: several large eggs which add protein to the meal
- Spices: cumin is my favorite for an earthy, spicy taste
- Herbs: cilantro for garnishing and that little extra pop of green

How to Make Green Shakshuka
This is a one-pan recipe, so whip out your cast iron and let’s get cooking.
- Cook the onion in a saute pan on medium heat for about 2 minutes. Then add the garlic and cook for an additional minute.
- Add the shaved brussels sprouts and cook for 4-5 minutes, stirring frequently. When the sprouts have softened, stir in the zucchini and spices for another minute.
- Add the spinach and cook until it starts to wilt.
- Crack the eggs evenly on top. Just use a spatula to create little wells for them to sit in.
- Reduce the heat to low and cook the eggs to your liking. If you’d like them to cook faster, just add a lid!
- Garnish with avocado and cilantro, and serve!

Make it Ahead and Freeze
If you’d like to make this green shakshuka ahead of time, simply make the veggie layer without the eggs. Then place it in a freezer safe container to store away. You can freeze this for up to 3 months.
Once you’re ready to eat, give your veggies a quick saute in the cast iron. Then crack the eggs on top to continue the last 3 steps of the recipe. This is perfect if you’d like to make individual portions in the future.

More Healthy Breakfast Recipes
Greens for breakfast (or any meal of the day) is essential. So here are a few more ideas on how to sneak some veggies into your morning routine.

Did you know I also have an orange shakshuka recipe? Oh yes, you must try that version as well!
And if you found this recipe from a Whole30 link, make sure to read my post 15 Whole30 Recipes for Breakfast, Lunch and Dinner, for more delicious ideas!
If you’re a fan of veggies for breakfast, you’re going to love this green shakshuka recipe! If you make it, let me know how it turns out in the comment box below.
Description
Green shakshuka puts a healthy spin on the classic shakshuka recipe with shaved Brussels sprouts, zucchini and spinach. You’ll love it!
-
Add the shaved brussels sprouts and cook for 4-5 minutes, stirring frequently. When the brussels sprouts have softened, add the zucchini and spices and stir for another minute.
-
Add the baby spinach and stir until it just starts to wilt, then turn the heat to low.
-
Flatten the mixture with a spatula and create 5 small wells, then crack the eggs into each well.
-
Cook until the eggs are done to your liking. You can also add a lid to steam and cook the eggs faster.
-
Sprinkle the fresh cilantro on top and garnish with sliced avocado.
Calories: 218kcal | Carbohydrates: 12g | Protein: 9g | Fat: 16g | Saturated Fat: 3g | Cholesterol: 164mg | Sodium: 325mg | Potassium: 656mg | Fiber: 6g | Sugar: 3g | Vitamin A: 1939IU | Vitamin C: 60mg | Calcium: 80mg | Iron: 2mg
©Downshiftology. Content and photographs are copyright protected. Sharing of this recipe is both encouraged and appreciated. Copying and/or pasting full recipes to any social media is strictly prohibited.
Recipe originally posted December 2015, but updated to include new photos and information for your benefit!